KEEPING YOUR MADISON, WI, HOME WARM
What Are Window Warmers™?
Window Warmers are insulating Roman Shades designed to prevent heat loss and cold infiltration that occurs with conventional draperies.
The important distinction between Window Warmers and conventional “thermal” draperies or insulated Roman shades is the effective all-around seal, which eliminates cold drafts passing around the edges of the curtain, keeping the heat in. That seal is provided by side clamps, which are stained or painted to match your existing trim.
Our Window Warmers are a wise energy investment. Over time, they pay for themselves and, through the choice of appropriate fabric, can also enhance your home’s décor. Both of which make your home more comfortable.
How Do Window Warmers™ Work?
The core of Window Warmers is a layer of thermolite-bonded fiber covered by a vapor barrier and enclosed in fabric. When the Window Warmer is lowered, the edges are sealed with the wood clamps. The design of Window Warmers incorporates both aesthetics and heat retention.
On winter nights or on dreary days, lower your Window Warmers to keep the warmth inside. During the day, let the sun warm your home by raising your Window Warmers.
Why Have Window Warmers™?
Studies have shown even in well-insulated homes, up to half of your heat can escape through your windows, including double-glazed styles, making cozy rooms drafty. Sliding glass doors are the worst offenders. That loss inflates your heating bill.
Based on the R-values of these components, Window Warmers add an estimated R-factor of 4 to an existing window. This value includes the dead air space created between the shade and the window. With Window Warmers in place, the heat loss through a double-glazed window is reduced by about two-thirds.
As an added bonus, Window Warmers can greatly reduce your cooling needs during the summer by closing them during hot days, blocking sunlight, and opening them back up at night. This keeps your home noticeably cooler all day long.
How Can I Get a Window Warmer™?
We offer Window Warmers three ways.
- We Do It All
- We Do Part
- D.I.Y.
We Do It All
Complete custom service – This includes consultation and estimate in your home, measuring windows, fabricating, installing, and fitting your new Window Warmers.
We Do Part
You measure your windows and do the installations per our Instruction Manual (available upon request). With your measurements and chosen fabric, we fabricate the Window Warmers for you.
D.I.Y.
You Do It Yourself. You provided us with your window’s measurements and chose a fabric. We provide you with all the parts and pieces, including the Instruction Manual you need to fabricate and install the Window Warmers yourself.
Window Warmer Video
Alliant Energy’s PowerHouse T.V. show stopped by Creative Energy Designs to learn how our all-in-one shade/vapor barrier/insulation Window Warmers can insulate drafty windows!
Window Warmer Photos
Photos of Creative Energy Designs, Inc.’s Window Warmer™ from various homes in Madison, WI, and the surrounding areas. A Window Warmer is an insulated Roman shade window treatment with wood side clamps. With the wood clamps closed, they help create an air-tight seal around the window, preventing drafts from blowing in around the window treatment. Covering your drafty windows with this type of window treatment helps keep your room warm and your energy bill low.
How to Measure for Window Warmers
Measuring the Width of Your Window
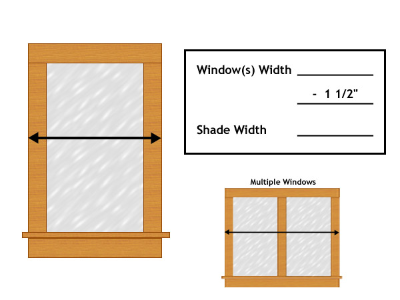
To figure your Shade Width, measure your window (s) and casing from outer edge to outer edge – this is your window width.
You then subtract 1 1/2″ (3/4″ on each side for the hinges that operate the wood clamps).
This is your final Shade Width.
Measuring the Height of Your Window
NOTE: When figuring your Window Height, you have three options for measuring depending on how you plan to mount your window Warmer.
Option 1: Window Warmers are usually hung from a Velcro Strip attached to the top edge of the window casing.
Option 2: A variation on that is with a Mounting Board. The Mounting Board is a #2 1X Pine Board that is mounted on top of the window casing, and the Window Warmer is then hung from the top edge of the Mounting Board. This allows the Window Warmer, when raised, to clear the window opening. This option should be used on doors, windows that swing inward, and whenever you wish to have more of the window exposed.
Option 3: Ornate Casings and other variations of trim may not allow the window Warmer to be mounted on top. The Velcro is then attached to the face of the window casing.
The other variation with Height Measurement is whether or not you have a sill. Without a sill, a bottom clamp is used to hold the Window Warmer tight to the trim. With a sill, the Window Warmer rests directly on the sill. The weight of the aluminum bar sewn in the bottom of the Window Warmer holds it tight to the sill.
Measuring the Height of Your Window – Option 1
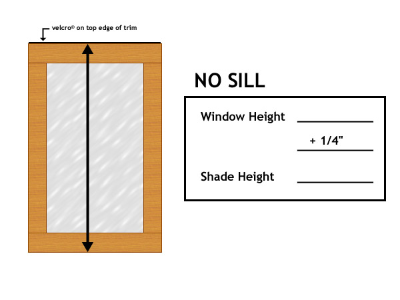
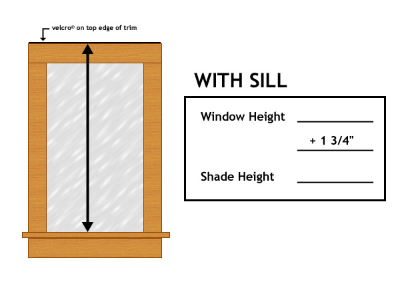
Option 1: Velcro attached to the top of the casing.
No Sill – Measure the window and casing from the top edge to the bottom edge – this is your Window Height. You then add 1/4″ – this is your final Shade Height.
With Sill – Measure the window and casing from the top edge to the top of the window sill -this is your Window Height. You then add 1 3/4″ – this is your final Shade Height.
Measuring the Height of Your Window – Option 2
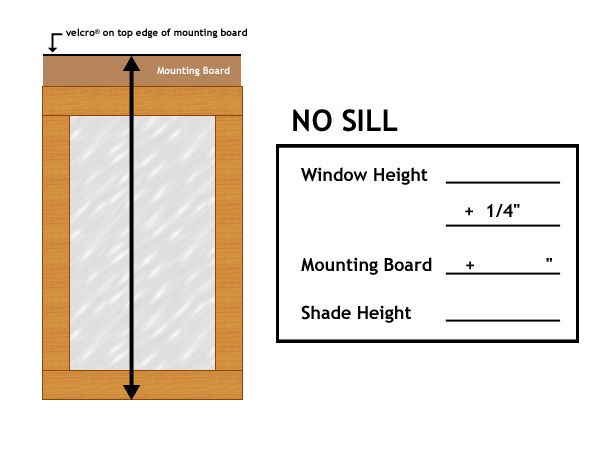
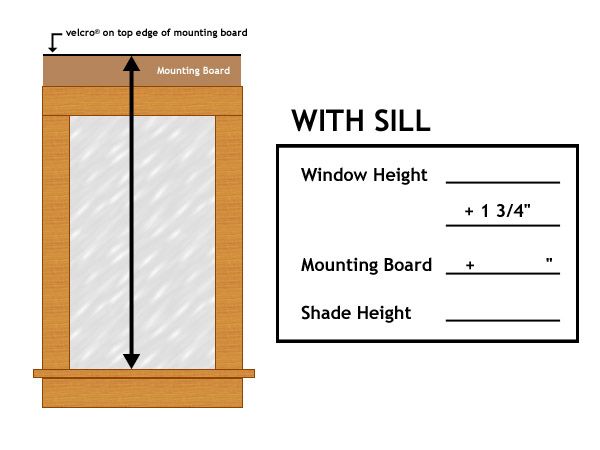
Option 2: Velcro attached to the top of the Mounting Board.
To determine the height of your Mounting Board, use the Stack Height & Mounting Board Dimensions Charts.
No Sill – Measure the window and casing from the top edge to the bottom edge – this is your Window Height. You then add 1/4″ and the height of the Mounting Board – this is your final Shade Height.
With Sill – Measure the window and casing from the top edge to the top of the window sill – this is your Window Height. You then add 1 3/4″ and the height of the Mounting Board – this is your final Shade Height.
Measuring the Height of Your Window – Option 3
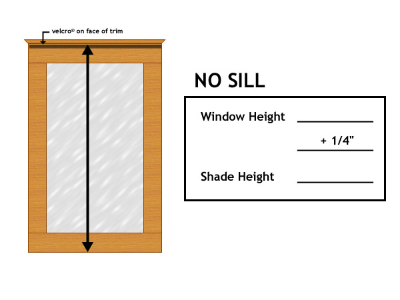
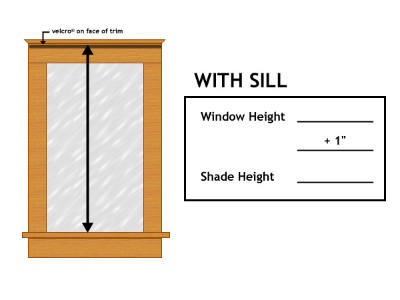
Option 3: Velcro attached to the face of the casing.
Determine where your Velcro will be on the top casing face.
No Sill – Measure the window and casing from the top of the Velcro to the bottom edge – this is your Window Height. You then add 1/4″ – this is your final Shade Height.
With Sill – Measure the window and casing from the top of the Velcro to the top of the window sill – this is your Window Height. You then add 1″ – this is your final Shade Height.
What Else Do We Offer?
From Our Workroom:
- Custom Draperies, Top Treatments, and Homegoods
- Shades and Blinds- All Kinds
- Interior Shutter (Real and Faux Wood)
- Custom Bedspreads, Bed Caps, & Pillow Shams
- Designer Pillows and Bolsters
- Reupholstery
- Fabric Wall Coverings
We Also Provide:
- In-Home Measuring Services
- Interior Design Services
- Experienced and Courteous Installers
Need help installing your custom window warmers? Call our team at 608-256-7696.


